Increase your growing success by giving your transplants a good start with a few simple planting techniques. Preparing them for the transition outdoors and planting properly will help you grow your best garden yet.
Transplants started indoors from seed or purchased at a local garden center or greenhouse need time to prepare for their outdoor home. Gradually toughen them up with a procedure called hardening off. This process helps them adjust to the outdoor growing conditions, so plants will suffer less transplant shock and establish more quickly.
Start by moving the plants outdoors to a sheltered and shady location about one to two weeks before the recommended planting date. Stop fertilizing and water thoroughly when the planting mix is starting to dry. Move the plants into an hour of direct sunlight the first day, increasing the time by an hour each day. Make this easier by placing transplants in a wagon, old saucer or sled. Keep frost protection handy or move the plants indoors when frost is in the forecast.
Once the plants are hardened off, move them into the garden. Water the planting mix thoroughly the night before planting. If possible, plant in the morning or on a cloudy day to reduce moisture loss and stress on the plants. Follow the spacing recommendations on the plant tags to save money and time. You will need fewer plants to fill the space and allow each plant to reach its full potential.
Press on the sides of the pot to loosen the roots and carefully slide the plant out of the container. Do not pull the plant out by the stem or you may end up with all stem and no attached roots. Gently loosen any encircling and tightly bound roots. This encourages the roots to explore the surrounding soil and establish a strong root system. Use your fingers to tease apart the roots or a sharp knife to slice through the surface roots in a few places.

Plant tomato transplants several inches deeper or set long leggy plants in a trench. This encourages roots to form along the buried stem. Remove the lowest leaves that will be covered by the soil and loosen the roots on the hardened-off transplant.
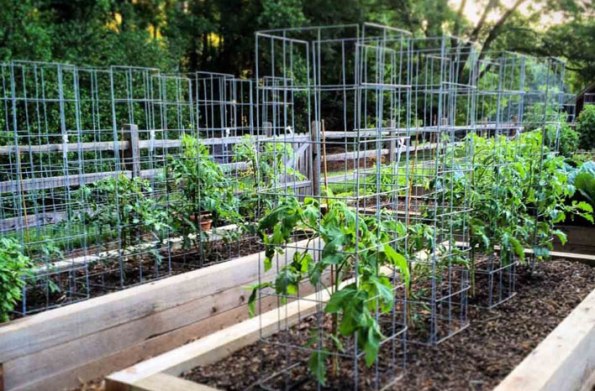
Dig a shallow trench two to three inches deep. Lay the leggy tomato in the trench and carefully bend the stem so the upper portion remains above ground. Cover the stem with soil and water. Set stakes and towers in place at the time of planting to reduce the risk of damaging roots and stems when you are trying to secure tall plants. Make sure the support is strong and tall enough for the plants.
Remove any flowers and fruit on the transplants at the time of planting so plants can direct energy into forming roots, resulting in more flowers and fruit over time. If you cannot bring yourself to do this, try removing flowers on every other plant or row at planting. Do the same to the remaining flowers the following week.


Water the new transplants often enough to keep the soil moist, but not soggy. Water them thoroughly and gradually extend the amount of time between watering to encourage deep, more drought-tolerant roots. Adding a layer of shredded leaves, evergreen needles or other organic mulch will help conserve moisture, suppress weeds, and improve the soil as it decomposes.
Implementing these strategies will help increase your enjoyment and reduce maintenance throughout the growing season.
Melinda Myers has written more than 20 gardening books, including Small Space Gardening. She hosts the “How to Grow Anything” DVD series and the Melinda’s Garden Moment TV & radio segments. Her website is MelindaMyers.com.
Related Articles & Free Vermont Maturity Subscription

Managing Scale, a Difficult Insect Pest on Houseplants
Perfume Your Garden with Lilies
Planning and Designing a Productive Vegetable Garden
Free Subscription to Vermont Maturity Magazine

Comment here